We accept:
How to improve FPS on your Gaming PC: Quick wins to advanced tweaks
This form is protected by reCAPTCHA - the Google Privacy Policy and Terms of Service apply.
Don't have an account?
Creating an account has many benefits: check out faster, keep more than one address, track orders and more.
You’re a serious gamer, so you don’t just want higher average FPS, but consistent, stutter-free frame delivery and predictable 1% lows, because when it comes to serious gaming, FPS is one of the most important aspects of your experience.
This guide is here to offer you an ordered, practical checklist, immediate actions you can take in 5–10 minutes, deeper system/driver tweaks, and an upgrade decision matrix, with measurable validation steps so you know what actually worked. Read the “Quick wins” section first, then dive deeper if you need more headroom.
Quick wins (5-10 minutes): get the obvious gains first
These are no-risk, high-return actions most players skip.
Update GPU drivers and vendor tools
Why: Keeping your graphics card drivers up-to-date is an easy way of ensuring your graphics card continues to perform optimally. GPU vendors continually ship optimisations and bug fixes, so a current driver is the foundation for everything else.
How: Use NVIDIA GeForce Experience (and install the NVIDIA app) or AMD Radeon Software to check/install drivers, or get the latest stable release from vendor sites. After updating, reboot and run a quick benchmark or in-game refresh-rate test.
Validation: Run a 1–2 minute benchmark (built-in or CapFrameX) before/after; look for % change in avg FPS and 1% low.
Set your monitor refresh rate and display mode correctly
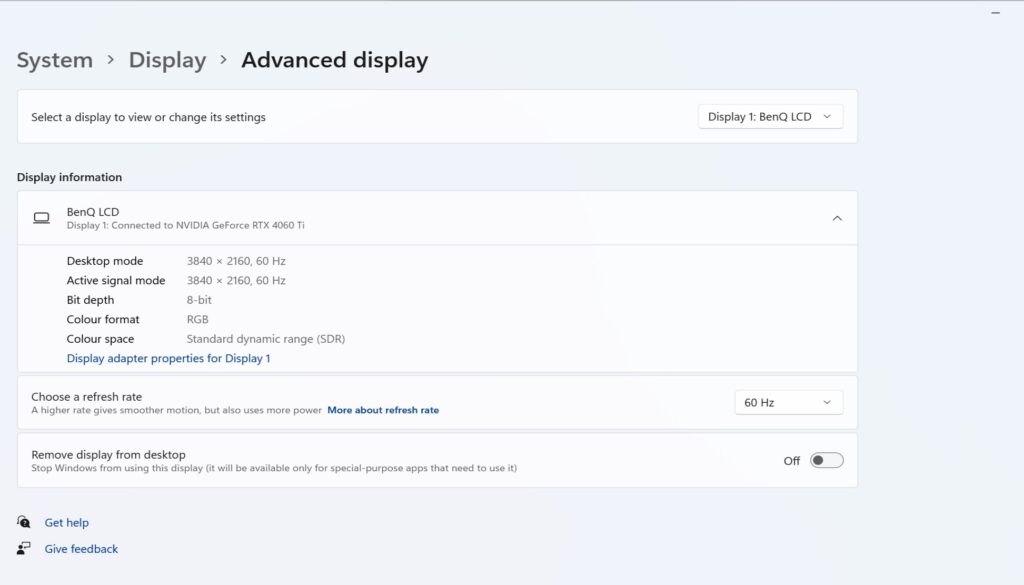
Your monitor's refresh rate refers to the number of times that your screen updates the image, measured per second. It is possible for you to have a high refresh rate monitor but to not be fully utilising it because your settings aren't correct. To make the most of your setup, make sure Windows display settings use the monitor's native refresh rate (144Hz, 240Hz, etc.).
To do this in Windows 11, press the Windows button and select 'Settings' (or press the "Windows Key" + "I") then select; 'Display' > 'Advanced Display' and locate, 'Choose a refresh rate'. you want to choose the highest option available on the drop down menu.
Prefer G-Sync / FreeSync where available; G-sync and FreeSync are both adaptive sync technologies that are designed to eliminate screen-tearing and provide smooth gameplay experiences. G-Sync is the Nvidia technology and FreeSync was developed by AMD. Enabling these technologies in your GPU settings will sync the GPU's FPS with your monitor's refresh rates, resulting in smoother gameplay. Do note though, that if your monitor has a lower refresh rate, your GPU will be limited to the monitors max refresh rate, so disable V-Sync if you target raw FPS and have adaptive sync or are using Frame generation (See our 'advanced' tips).
Validation: Switch refresh rates and note visible smoothness and input feel.
In-game preset checklist
Most games will have the option to adjust settings 'in-game' to allow the game to run more smoothly, letting you increase or decrease resource intensive graphics effects.
Triage settings by visual cost on a per-game basis: Shadows, screen space ambient occlusion (SSAO), reflections, and volumetrics are often the biggest FPS sinks. Keep textures high if you have sufficient VRAM but drop shadows/ambient occlusion first. Use vendor upscalers (DLSS, FSR, XeSS) if they are available as they often give big FPS gains for minimal clarity loss.
Kill background processes and use Game Mode / optimiser
Save your CPU by closing any overlays and heavy background apps (browsers with many tabs, Discord streaming) and you should notice a significant performance increase.
You should also enable Windows Game Mode and try an optimiser like Razer Cortex for automatic process suspension which is good for freeing memory and CPU cycles quickly.
To enable game mode, hit the Windows button, and locate Settings > Gaming > Game Mode and make sure it is enabled;

System and OS optimisations (30-60 minutes): Get the OS to stop tripping you up
The following steps take a little more time than our quick wins, but should help to stabilise performance gains.
Power plan, priorities and windows visuals
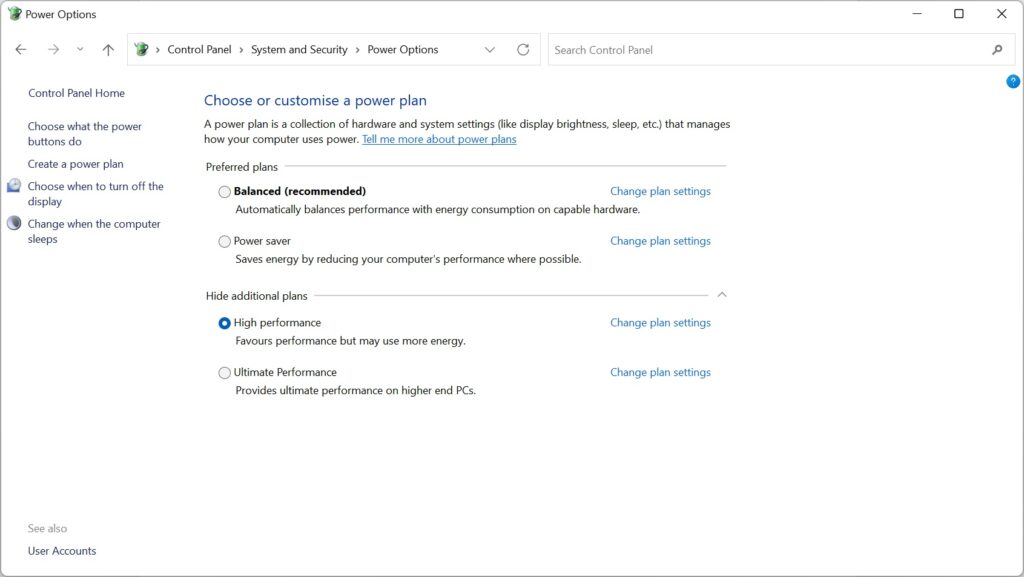
You'll want to set your Windows power plan to "High performance" or equivalent for desktops; for laptops, select max performance on AC power. To enable the high performance power plan, click the Windows button and search for and open the 'Control panel'. Select, 'System and security' > 'Power options' and then click the arrow next to 'Show additional plans'. From here, click 'High performance'.
You should then also disable unnecessary Windows visual effects such as transparency and animations, to cut background GPU/CPU cycles. You can locate these settings in 'Settings > Personalisation > Colours'.
Shader cache and precompiled shaders: pre-bake expensive work
Shader compilation stutters happen when a GPU compiles shaders on the fly during gameplay. Make sure your GPU’s shader cache is enabled (AMD/NVIDIA options) and allow the game to build its cache (play some scenes or load times). Setting a larger shader cache size dramatically reduces first-run stutters.
Storage and streaming hygiene
If you're experiencing stuttering mid-game, try moving the game to a fast NVMe drive if possible, or else check that texture streaming settings aren't forcing high-latency disk loads. You can also try freeing space and defragmenting (HDD) or trimming (SSD) to avoid I/O stalls.
Network basics for online FPS
For online games, latency isn't the same thing as FPS but it does affect perceived smoothness. Use wired Ethernet where possible, prioritise game traffic in router QoS if supported, and test ping/packet loss to the server.
Expected gains:
These steps stabilize the frame delivery and reduce micro-stutters; expect improvements in 1% lows and fewer hitches.
Thermals, drivers and GPU features (advanced)
When the basics are done, the next layer is driver features, thermals, and careful GPU tuning.
Frame generation / Smooth motion (what it is and when to use it)
Frame Generation (aka Smooth Motion in more recent drivers) uses AI/interpolation to create extra frames and can increase perceived FPS dramatically, but it can introduce microstutters or change motion feel and may increase latency in certain scenarios. Use per-game testing, and enable it in driver tools on a per-game basis rather than globally.
Trade-offs: +Average FPS and smoother visuals vs possible added latency and compatibility issues for Vulkan games or titles that don’t play well with interpolation.
Safe GPU/CPU tuning (overclocking checklist)
Increase clocks in small steps (+20–50 MHz), monitor temps, and validate with stress tests (Unigine / 3DMark / in-game long runs).
Watch thermals: if temps go high, stability or boost behavior can degrade performance. Lower fan curve only if you accept higher temps. Use conservative voltage increases; prioritize stability.
VRAM and driver limits
High texture packs can exhaust VRAM causing frame drops. Monitor VRAM usage in-game (most vendor overlays can show this) and lower texture quality if you hit capacity.
Checklist: Experiment with Frame Gen per-game, use conservative overclocking, and keep a thermal safety margin.
When and what to upgrade
If you’ve exhausted software and system tuning, it’s time to decide what to buy.
Bottleneck test: CPU-limited vs GPU-limited
Run a GPU-intensive benchmark at your target resolution. If GPU utilisation is near 95–100% and CPU utilisation is low, you’re GPU-limited and a GPU upgrade will help. If GPU utilisation is low and CPU cores max out, you’re CPU-limited and most likely have CPU or game-thread scaling issue. Also test by lowering resolution drastically: if FPS shoots up, your GPU the was bottleneck; if not, it's likely your CPU or IO.
Quick upgrade paths by target
Competitive 1080p 240+Hz: Prioritise high single-GPU graphics card (e.g., high-end 30/40/50-series equivalent), high refresh 240Hz monitor, and low-latency CPU.
1440p 144Hz: Aim for a balanced GPU and CPU, and a fast NVMe for texture streaming.
4K 60+: Top-tier GPU and 16–32GB fast RAM.
PSU and compatibility
Check PSU wattage and rails. A GPU upgrade without a capable PSU can cause instability.
If you ultimately decide that a new PC is going to be the best option for you, then check out our extensive range of pre-configured and configurable gaming PCs.
Testing and maintenance: measure what matters
Don't guess: benchmark!
Tools and metrics
- Tools: CapFrameX, RTSS/FRAPS, OCAT, vendor overlays
- Metrics: Avg. FPS, 1% low, 0.1% low, frametime variance. 1% / 0.1% lows are often more important than the average for perceived smoothness.
Sample quick benchmark routine
- Clean boot (close background apps).
- Run a 5-minute consistent scene (e.g., repeatable benchmark run or the same map segment)
- Record avg. FPS and 1% low.
- Apply one change (e.g. driver, DLSS on), repeat
- Compare deltas and decide if the change is acceptable (weighing visual impact vs. FPS gain)
Pro tip: Only change one variable at a time to isolate effect.
Quick troubleshooting (common symptoms to likely causes)
Severe stuttering on first load only → shader cache or shader compilation. Pre-populate caches or let the game compile
FPS spikes then drops under load → thermal throttling or power limit hitting. Check temps and power draw
Low average FPS but low GPU utilization → CPU bottleneck, or background CPU work
Micro-stutters despite high avg FPS → frametime variance; investigate drivers, overlays, and storage streaming
Conclusion: Measure, then act
Start with quick wins (drivers, in-game settings, background cleanup) to get immediate improvements. Move to system-level fixes that stabilise frame delivery (shader cache, storage), then test advanced features like Frame Generation on a per-game basis. When you reach the limits of what software can do, use the bottleneck tests to make informed upgrade choices.
Key takeaways
- Update GPU drivers and set your monitor refresh rate first
- Triage in-game settings: shadows / volumetrics cost the most; use DLSS/FSR where available
- Precompile shaders and ensure fast storage to avoid mid-game stuttering
- Frame Generation (Smooth Motion) can deliver large FPS gains but test per-game and watch for latency/trade-offs
- Use proper benchmarking (avg. FPS + 1% low) to prove any change's value.